Installation Guide of TFC project
(by L. Abadie, LHCb computing group)
2) Create the TFC project in PVSS
5) Download a specified version of the project from cvs
6) Download the different modules from cvs
10) Conclusions
11) FAQ
To run this project, you need:
· A connection to the CERN local network (dfs or afs) in order to access the configuration database and access to wincvs.
· To install PVSS
![]()
2) Create the TFC project in PVSS
This operation has to be performed only once.
· Create a new PVSS distributed project called TFC.
· Install the Framework tools from this site
http://itcobe.web.cern.ch/itcobe/Projects/Framework/Download/welcome.html
The instructions are given in this document
http://itcobe.web.cern.ch/itcobe/Projects/Framework/Download/Framework/framework2.0.9/fwReadme.txt
You just have to follow the instructions until the item 8.
· Install the following components
o fwDim (check that the version number > 13.0)
o fwCore
o fwConfigurationDB (the latest one)
o fwAccessControl
To access to the LHCb CVS server, you need to configure a ssh connection and to configure wincvs.
To configure it properly please read this page (item 7 for Unix user and item 6 for Windows users)
For Windows, download the wincvs (the version of 1.3.17.2 ) from http://wincvs.org/download.html.
If you don’t any account on the LHCb CVS server, you can ask Loic Brarda to add you or I can send you my private key.
![]()
(All the managers must be stopped)
· Run WinCVS
· Go to Cvs Admin->Preferences->General
· Put CVSROOT to :ext:(username)@isscvs.cern.ch:/local/reps/lhcb (cf Figure 1)
(username=labadie for example if you have my keys)
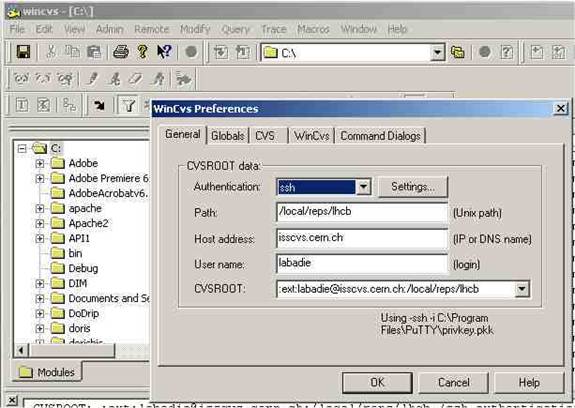
Figure 1 Configuration of wincvs
· Select ssh for Authentication.
· Click on Settings (you should see something like Figure 2)
· Check RSA private key file and put the location of your private key file
· Check the SSH client and put the path of plink.exe(in PuTTY)
· Check Additional SSH options and put -ssh
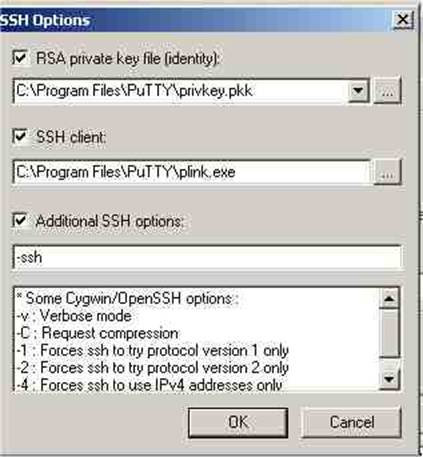
Figure 2 SSH options
These previous steps have to be done only once.
· Go to Remote/Checkout :
o First it asks for a directory to checkout to. Select the folder in top of your project. For example, if your TFC project is located under../pvss_tfc/TFC, do the check out in the ../pvss_tfc folder.
o Then, it asks for a module name. Type in TFC/config
o Go to the directory where the module has been checked out and open progs with a text editor.
o Append the different managers in your PVSS project according this file. (This should be done whenever this file changes).
NB: you have to append the managers manually because PVSS will overwrite the progs file.
· Some comments are given about the consoles which have to be started manually (regarding the order), in the 5)
![]()
5) Download a specified version of the project from cvs
(All the managers must be stopped)
If it is the first you are working on this project you have to check out all the packages which belong to the project. To do it, look at Figure 3
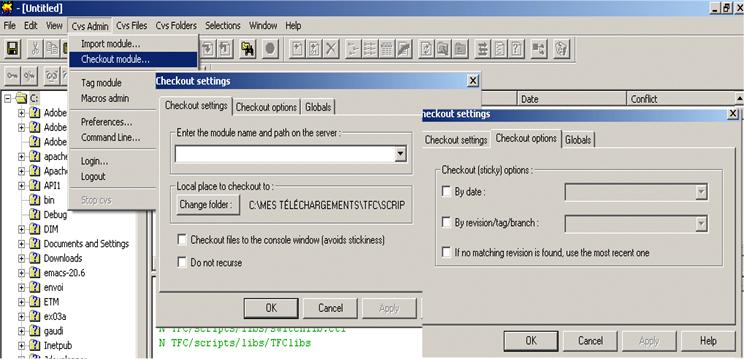
Figure 3 Check out a module and options
To know the different versions and their changes go to the CVS web repository:
http://isscvs.cern.ch/cgi-bin/cvsweb.cgi/?cvsroot=lhcb
When wincvs asks you for a directory to check out to, you have to select the folder which is on the top of your project: for example if the address of the PVSS project is C:\pvss_tfc\TFC, you just select C:\pvss_tfc\. It will overwrite the existent directories.
You can also do a check out in a special directory which is dedicated for that and copy paste of the things you want. Thus it won’t overwrite things you don’t want.
![]()
6) Download the different modules from cvs
The different modules to check out are (the order doesn’t matter):
If it is the first time you have to check out:
Here follows a description of the different modules.
NB:
· The script called TFC_subscribe.ctl stores all the DIM services, commands and RPCs used in the TFC project.
- Start this script from the console after you have started the project. Normally, you should see a Ctrl manager whose properties are something like -num 5 TFC_subscribe .
If not append a Ctrl Manager with a number and the name of the script.
(Ex: -num 5 TFC_subscribe). It will create everything related to DIM.
- This script should be started whenever you have added a new DIM service, command or RPC, in other words, when you have modified this file.
- To add a new service, command or RPC, look at the DIM page
· The script called Available_subsystem.ctl gives all the free subsystems and all the possible activities in the current moment. – Start this script from the console in the same way as for the TFC_subscribe.ctl
- Run the panel (MyTopP2.pnl, first one) when you can see a big list in the log view file. Otherwise it won’t work.
- DatapointType_panel.dpl: it creates all the datapoints belonging to this project.
- Datapoint_fwPanel.dpl : it creates all the datapoints used for the framework (except for the fw tables)
- fwConfigDB.dpl: it creates all the datapoints used by the fw tables for the Conf DB
- Store all the extra scripts used by the project namely PL/SQL scripts which are stored in the TFC/Extrascript/SQLSCRIPT. There is a readme file which comments the PL/SQL scripts.
- There is also the source of the SQLsystem which is a DIM server which asks requests to the conf.DB via DIM. It is located in TFC/Extrascript/Windows/SQLsystem. The programs are commented.
These names are the different inputs for “Enter the module name and path on the server” (cf Figure 3)
![]()
7) Environment variables (to perform only once)
a) For DIM
For Windows users: go to start -> right click on My Computer -> select properties ->go to Advanced-> click on environment variables.
· Add a new variable in the system variables called
DIM_DNS_NODE whose value is the name of your computer (if it doesn’t exist!)
To know the name of your computer, go to start -> right click on My Computer -> select properties -> go to Computer Name. You get it from the line Full computer name.
· Edit the path variable of the system variables and the user variables (for this latter add it if it doesn’t exist) you have and add the path where the
dim.dll is located. This dll is located in the bin directory where you have installed FrameWork components. (if it doesn’t exist !)
b) For Oracle
For Windows users: go to start -> right click on My Computer -> select properties ->go to Advanced-> click on environment variables.
Edit the path variable of the system variables you have. Check you have this one.
G:\Applications\Oracle\OraInst\v5\Rdbms9i\bin. If not add it.
You also have to add an ODBC driver in order to use the Configuration database JCOP Framework.
For this purpose, go to Control Panel->Administrative Tools -> Data Sources (ODBC).
Then a Dialog Box appears.
In the user DSN part click on Add.
It asks for a driver, select Oracle in OraHome9i.
(If it’s not present, you have to install Oracle in your machine.
Go to the control Panel-> Add or remove programs. Install Oracle tools v5. Follow the instructions.
When the installation is finished, check that your Oracle Home is set to 9.
For that, go to Start->All programs->Oracle Tools->Oracle Basics 9i ->Oracle Home Selector. Put it to OraHome9i, if not.
For any help during the installation, go to the Oracle support web pages:
http://wwwdb.web.cern.ch/wwwdb/)
Once, this done, you can install the driver Oracle in OraHome9i.
Then, put the same things as you see in Figure 4
Figure 4 ODBC Driver configuration
Do the same thing for System DSN
![]()
The order has to be respected!
· Execute the dns.exe located in the bin of FrameWork folder
· After execute the SQLsystem.exe (the executable included in the zip file)
· Start your project: you just click on the green traffic light !
· Then 2 cases:
o You have never run the project before (follow the order):
You start all the ASCII managers (normally 3)
You start fwFsmSrvr
You start PVSSdim
Then you start the TFC_subscribe.ctl
Then you start the other Ctrl manager (normally 5:
Odin.ctl, FrejaP1.ctl, ThorP2.ctl, Available_subsystem.ctl
Subsystem_FSM.ctl)
o You have run it before (follow the order):
You start fwFsmSrvr
You start the PVSSdim (you can put it to automatically, now)
Then you start the other Ctrl manager (normally 5:
Odin.ctl, FrejaP1.ctl, ThorP2.ctl, Available_subsystem.ctl
Subsystem_FSM.ctl, )
Then you are ready to use the project.
The first panel to run is the Device Editor & Navigator.pnl
· Go the FSM view
· Be sure to be on navigator mode (cf Figure 5 )
· Select the root of the tree
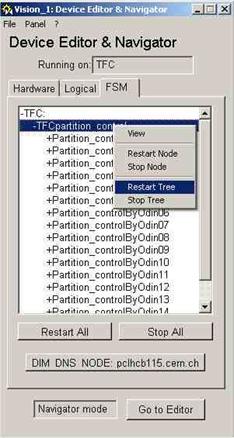
Figure 5 DeviceEditor & navigator
· Right Click with the mouse on restart tree
The second panel to run is called MyTopP2.pnl (cf Figure 6). Wait a little before running this panel: the FSM states have to be configured first ( you can see the logfile to check wether it’s ready or not).
You select an activity for the readout supervisor and subsystem.
You click on find ODIN and you get the connectivity between the selected subsystems and the TFC switch. It also suggests you a free ODIN and its connection to the TFC switch.
(cf Figure 7)
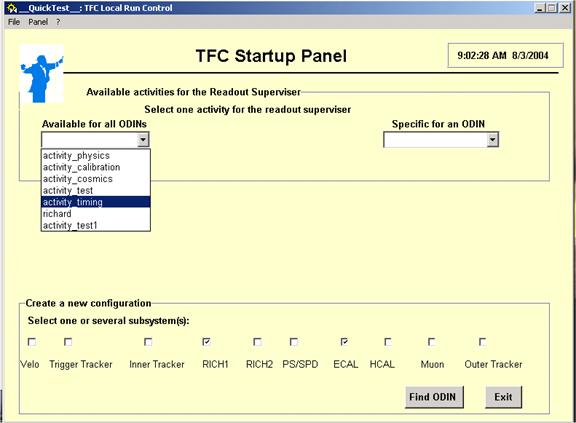
Figure 6 MyTopP2.pnl
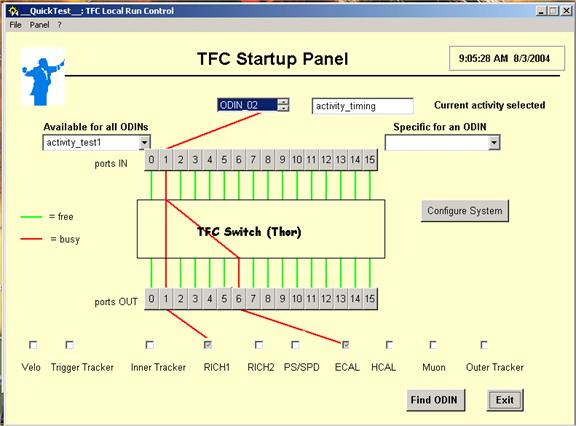
Figure 7 switch.pnl
To configure new activities or monitor the readout supervisor, click on configure system. (cf Figure 8)
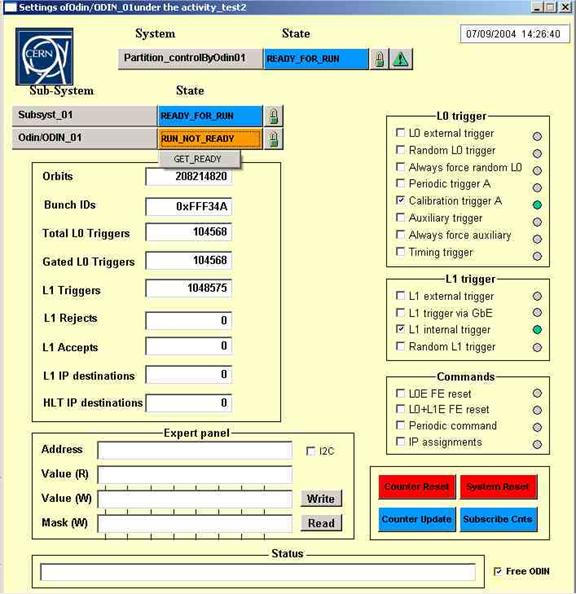
Figure 8 TfcP2.pnl
Click on Save settings to save your new activity as recipes.
To start a run, you click on run not ready, select get ready.
Then click on ready for run (of Odin/…) then select start run.
![]()
Once you have developed a new working version of TFC project, you may want to save it into CVS repository.
You have two possibilities:
Select the files to update and don’t forget to go to Cvs Files/Commit Files.
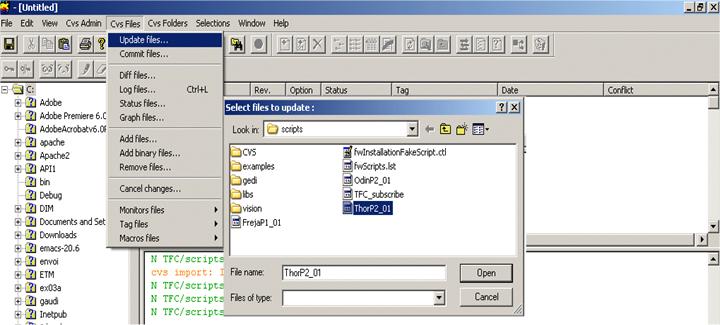
Figure 9 Updating files
Select the folder to update and don’t forget to go to Cvs Folders/Commit folders.
Wincvs increment automatically the version number.
![]()
10) Conclusions
· To remove definitely any projects of CVS repository, you have to ask Marco or Florence
· People should lock the folders or files on which they are working: it will avoid of having merging problems. And don’t forget to unlock it…
· Other possibilities: send a mail to the concerning people.
· If you have any comments or any problems: send me a mail
![]()
11) FAQ
Waiting for your feedback…